Teacher’s Tools: (I)
Posted by Andrew | Filed under Computing
Regular readers of this blog will know of several things discussed here previously: my desire to get away from the shackles of the Windows PC platform; my need to produce teaching materials quickly; and a desire to explore new computing avenues, in the sense of discovering new software or methods, which may make tasks easier or faster and myself more efficient in a job where time is often short. My transition from a Windows-based to a Linux-based lifestyle has not been without problems but there have been many unforeseen practical and social benefits, and I now feel that it is time to share these with others. We will begin with a very important free tool: the GNU Image Manipulation Program (GIMP).
How times and circumstances change! When I left England in September 2002, I had almost nothing that could not be contained in a single large suitcase, which by this time has long since expired and gone the way of all things; now I am sitting in my latest apartment in Miryang, effectively a public servant, working in a state elementary school. And along the way, of course, I have been collecting things as one does – books about teaching and other things, two computers (one, alas, now temporarily defunct after the motherboard died the other week), all sorts of electronic gismos (because I'm that kinda guy) and half a ton of clothing which has to be chucked out some time soon because I just don't have the space here for it.
One thing has become clear, however: firstly because of lack of available room, and secondly considering the virtue of prudence when letting go of my precious cash, any substantial new item needs to be thought about carefully before committing to a purchase. Substantial items – in this case, say, a new computer – are those from which the maximum practical benefit has to be extracted, and in the case of someone like myself, employed at public behest in education, such a tool has to perform many functions. For example, I may come home at night and be up until 11:00 p.m. preparing notes, lesson plans and materials for the next day, and for functions like this, a good computer combined with a good quality printer and a high-speed Internet connection are essential. Or I might need to process video files from either of my two cameras. And while I do all of this, I am probably listening to music. A modern personal computer has become an indispensable work tool, a means of communication (for example, using video or voice or keyboard chat clients) and an entertainment centre, all at the same time.
With these things in mind, I want to start discussing a number of software tools, the ones I use literally every day to do my job. In this discussion, the following points are important:
1: Cross-platform compatibility: An emerging trend, concurrent with the rise (and increasing popularity) of new operating systems is the demand that programs available for one platform (usually Windows) should be "ported" to others such as MacOS, Linux and BSD. This is important for a number of reasons, but the most fundamental is that, in a situation where customers are permitted their personal choice of platform, they need to be able to manipulate the files they desire using the software of their choice. There are a number of ways of doing this, which involve different levels of complexity.
What this means in practice is that on the one hand, in the Windows/MacOS ecosystems, there will be a number of popular (and therefore practically and socially important) programs which manipulate files as the user requires, but they will tend to be relatively expensive (MS Office, for example). Conversely, there will tend to be equivalents with differing levels of compatibility with MS platform apps available in the GNU/Linux (and other) ecosystems, and because of the compatibility issues these may have to be chosen and used with some care. However, if you stick to the same apps across OS boundaries (OO and GIMP, for example), there should be no problems at all.
A point of difference between purchasing a Microsoft PC and a Mac, which should also be borne in mind, is that many apps which often have to be purchased separately when you buy a PC are part of the "bundle" when you buy a Mac. In my experience, past PC purchases have often involved acquiring software for which I have absolutely no use at all.
2: Cost: Applications developed specifically for the Microsoft platform tend to be expensive; conversely, equivalents developed as F/OSS projects are usually free and can be downloaded and installed easily using the distribution's own Package Manager. This includes such apps as OpenOffice, GIMP, and in my own case others such as AbiWord, KOffice, KMess/AMSN, FileZilla (for web site file transfer and maintenance), Opera, Firefox and SeaMonkey (web browsers) and other apps used for voice and video recording manipulation.
Outside of the MS and MacOS ecosystems, the user can find a wide range of apps that perform the functions they require and are entirely free. However, this is not intended to be a rant against organisations or individuals who want to profit from the sale of their own (or someone else's) software; there are also proprietary apps for Linux such as SoftMaker Office, which is reasonably priced, has regular free updates for paying customers and excellent compatibility with MS Office plus export to PDF format. Similarly, Crossover Office is the commercial version of the WINE (WINE Is Not an Emulator) application interface, which allows the user to run Windows-platform apps in a window under Linux at the same time as other native Linux apps.
A basic Linux system is available free of charge from many different public server mirrors and can be downloaded easily as a *.torrent file, burned to CDs or a DVD and installed. The programs and tools designed to be used with it are mainly free and there are no restrictions upon copying and installing it. This is not true with distributions intended for business users, but the companies involved need income in order to continue, and we should support them.
3: System integration: It goes without saying that if you have a Windows system, it should be fairly fast and responsive, and allow you to undertake tasks such as file transfer and printing rapidly, and of course, this is necessary when using other operating systems also. So for my Linux installations, I always use Mandriva, the well-known and established French distribution, because I can make it look exactly how I want it to look and do exactly what I want it to do.
4: Security and stability: The Achilles' Heel of the Windows platform has always been a fundamental lack of inbuilt security. Over time, a ridiculous number of viruses, Trojans, worms, browser exploits, keyloggers, you name it, have been designed with the specific intent of denying users the utility of their Windows system. At the same time, Microsoft have been obsessed with not losing existing customers, who are often happy using very old software, so backwards compatibility with newer versions of their OSes has been seen as important, but alas, this also means that all the old "infections" can still be acquired.
One advantage of the "dual-boot" arrangement – whereby Windows exists in one hard drive partition, and Linux in another – is that Linux has the tools to view the Windows partition and copy files from there to its own filesystem. This is especially important because the viruses and malware which infest Windows do not affect Linux and are not brought across the partitions when files are copied, and therefore in a crash situation under Windows, files can still be saved easily under Linux before Windows has to be restored or reinstalled. In my own experience, this has been very important, and also highlights, again, the virtue of using the same apps wherever possible under both systems, as this means that workflow need not be compromised.
5: Internationalisation: A final (but very important) point is that of languages. It used to be the case that when you bought a copy of Windows, you were able to use whichever language you wanted that was available on the installation disc(s). However, from WinXP onwards, this was no longer available, due largely to Microsoft's desire to combat OS piracy by restricting versions to particular zones, rather like DVD player "zoning". From Vista onwards, it seems, users can once again change the interface language – if they purchase one of the more expensive versions of the OS.
For me, this turned out to be the killer for my interest in Windows. Firstly in Taiwan, I had to use machines with Traditional Chinese interfaces, and then in Korea, with the Korean language interface. This left me with a problem . . . if there were a security-related message suddenly before me on the screen and I didn't understand it, how could I be certain that the system was secure? I couldn't. So I switched to Linux, and never looked back. The i17n and i18n internationalisation systems allow the users to specify which language(s) they want on the system at install time, or later using the package manager. This means that an organisation can easily have a system that allows different users to have interfaces with their own languages, set up on an individual basis for each user's login profile. Priceless! Now I can do everything in British English and not worry about system messages being in another partly-comprehensible language . . .
The UNIX Rationale
We will not look here into the history and rise of Linux, except to say that the original designer of the Linux kernel, Linus Torvalds, did so because he liked UNIX (see http://en.wikipedia.org/wiki/Linus_Torvalds for a brief review of the story). Linux has arisen as it has because it is essentially a "child of the Internet": from the early days when Torvalds was making postings on BBSes and asking people what they thought of his product, a huge global ecosystem has evolved, with people designing, testing and distributing the OS which has arisen. Strictly speaking we should probably call the result "GNU/Linux", because Torvalds has concerned himself mainly with overseeing the development and maintenance of the Linux kernel; the rest has developed out of the existing free software movement – see http://www.gnu.org/ and also http://en.wikipedia.org/wiki/GNU.
The rationale for the UNIX environment is that applications which manipulate files are designed for a single function only, and to do it very well. This stands in contrast with major applicationss in the Microsoft ecosystem where a multi-functional approach is often taken, although there are plenty of exceptions. This, however, is the essential difference of approach between the two ecosystems. The GNU/Linux ecosystem tends to support the freedom of the individual, both developer and user, whereas there has arisen a much more business-focused, proprietary-ware ecosystem under Microsoft's platform.
With these points firmly in mind, we proceed to our discussion of a very useful piece of software: GIMP.
GIMP – GNU Image Manipulation Program
GIMP has evolved into a rich tool for manipulating and transcoding between a wide variety of graphic formats, allowing users to crop, resize, colourise and otherwise transform static images as they desire or require. Our interest here is firstly that because GIMP has been ported to a number of platforms, we can use the ports under both Windows and Linux to perform the same graphic manipulations, and secondly, that there are a number of basic functions we need to perform on a daily basis for which it is perfectly suited – and non-proprietary and free.
Installation for Windows
Download the latest stable version of GIMP from http://gimp-win.sourceforge.net/stable.html. Note that the extensive help files are a separate download and so must also be installed separately. After downloading, double-click on the GIMP icon to install, and when this is finished, do the same for the help files, following the instructions that come up in the dialogue boxes during the process.
Installation for Linux
Because the actual package managers differ between major distributions and their derivatives, installation processes also differ. If you have installed Mandriva like myself, you can use the graphical package manager as root – select and install the gimp and gimp-help files, then also go into a terminal program like Konsole (under KDE) as root and type firstly:
updatedb
and when disc activity has ceased:
makewhatis
and allow this activity to cease, also.
Mandriva Linux is based upon Red Hat and uses the RPM (Red Hat Package Management) system for installation and removal of program files and libraries. The two commands used here are for updating the software installation databases, and should both be performed whenever software is installed or removed. If you go to the main menu after these two processes are completed, you will find "GIMP" under "Graphics".
Now click to begin!
Using GIMP – Basic Functions

Depending upon the installation, either two windows (as here) will be opened, or a third workspace window will also be opened. The left hand window is for tool selection, and the right hand one is for layers, paths, undo etc. Either or both of these can be minimised as required during use.
1: Open a file: No mystery here, folks – either click "File > Open" or Ctrl + O.

A dialogue box comes up which allows you to open a file from a chosen location as normal:
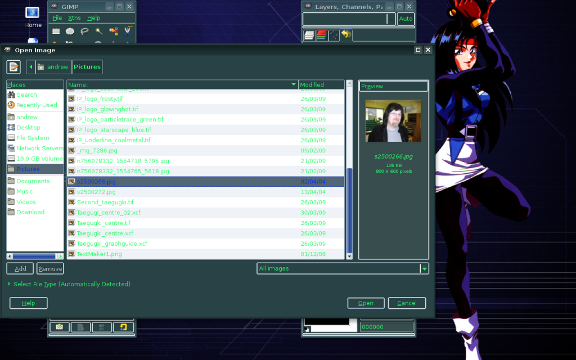
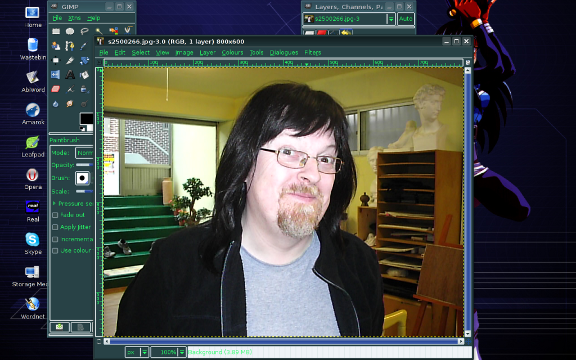
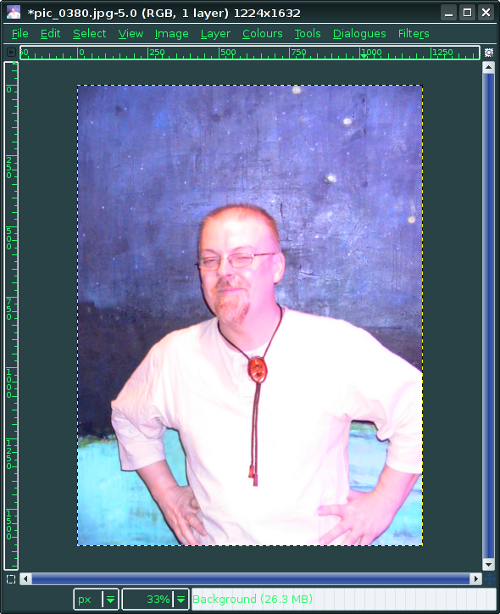
Select the file you require and click "Open". A workspace window opens with your chosen file . . . dang, who's that good-lookin' dude???
Now we will begin looking at some basic GIMP functions.
2: Cropping pictures: Having opened a picture, select the crop tool from the left dialogue box:
![]()
The mouse pointer now shows the same crop tool icon plus a crosshair when you move it over the picture. To perform the crop, place the pointer at the intended top-left corner of the cropped picture, press the left (if you are right-handed) mouse button and keep it pressed as you move the pointer downwards and to the right to the intended bottom-right corner of the cropped picture. Now release the mouse button. You have made your selection.
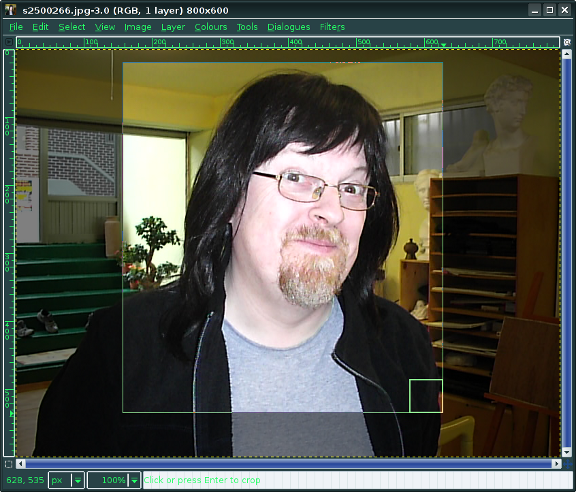
If you now move the mouse pointer over the selection, you will notice a number of small frames. If you press and move the pointer as you did when selecting when it is over one of these frames, you can change the dimensions of your selection to suit. Finally, make a single click on the picture to execute. Voila! You have successfully cropped your first picture with GIMP!

You can now save the file. Click on "File > Save As . . ."
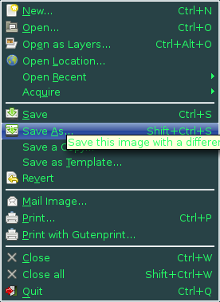
The save dialogue box comes up, allowing you to select where you want to save it.
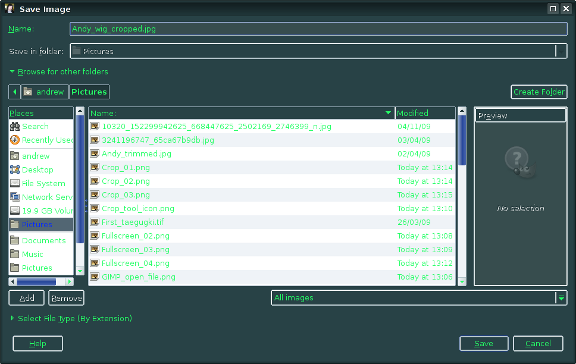
In the bottom right corner is a filetype selection menu – the original file was a *.jpeg, so we select "JPEG" first, then when the menu is out of the way, click "Save":

Another smaller dialogue box comes up, allowing us to change some parameters before finally saving:

As we become more familiar with GIMP, we might want to make use of these:

Finally, click "Save" to save the cropped picture.
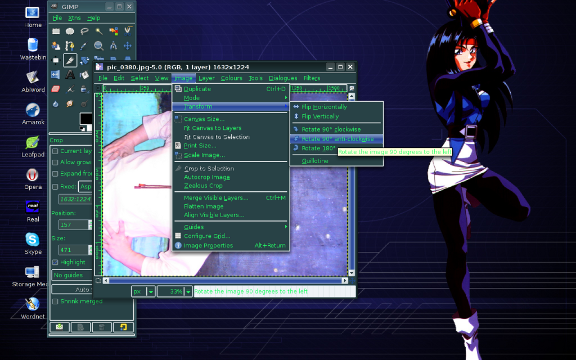
3: Rotation: Another frequent function needed when manipulating graphic files is rotation – for example, you took a photo but you held the camera sideways (long dimension as vertical) to get more into the picture. This is a very simple function to use.
Again, open the picture you want to rotate:

From the top menu, select "Image > Transform > Rotate 90 (degrees) anticlockwise" and click:
You can expand the workspace window to see the full rotated picture:
Now save as before.
4: Scaling: Normally, when we take a picture like these and place it in a document, we can alter the horizontal and vertical dimensions with no trouble. However, there are times when we want the image to remain permanently at one size – for example, for personal documents or for web page use – and here we use scaling.
Again, open your chosen picture and choose "Image > Scale Image" from the top menu:

In the new dialogue box which pops up, there are two parameters which concern us here. The first is "Image size" (width and height). The small chain image linking the two number boxes indicates that when the image is scaled, the aspect ratio (i.e. the proportions of vertical to horizontal) are maintained as in the original – meaning that by clicking on the chain, you can prevent this if you want to, for example to expand it sideways (which is therefore out of proportion).

The other two figures are the resolution of the image, in this case in pixels, although you can select other units if you want. Be warned, however, that although you can increase the number of pixels, the resolution will remain unchanged – meaning that you can enlarge the image but it will become more "pixellated" (blocky and chunky in appearance) if you use an image viewer to "zoom in". Conversely, if an image is scaled down, it also becomes increasingly pixellated if you then try enlarging it with your image viewer. Images which are scaled down for use in web pages will therefore appear pixellated when viewed with the "Zoom" facility using the Opera browser, for example.
In this case, we will take the width down to 200 pixels, and because the vertical is linked, it immediately changes to 219 pixels when you click on it:

To complete this process, click on "Scale" once the desired dimensions have been achieved:

Obviously, if the size is critical, you need to exercise some judgement beforehand in selecting it, or perhaps experiment until you get what you want.
Finally, save the transformed picture as before.
These three basic operations are the ones I use all the time, in combination with OpenOffice, to produce documents such as flashcards and dice games, and others such as the wall hanging used to illustrate parts of the house in my recent KEB Evaluation Lesson. This was possible using my recently-purchased Epson Stylus Photo 1390 printer, and it's worth noting that one problem I found with this was, in fact, scaling – which I could have avoided (if I had thought about it at the time) by creating fixed-size images this way. Lesson learned, I think.
This concludes my first blog about the use of F/OSS applications. GIMP is a powerful tool, and free, so go out and use it – and maybe buy one of the user handbooks which are available. There's nothing to stop a dedicated person becoming an expert.
Andrew. ^_^
Edited 16th November 2009.
Tags: crop, elementary, GIMP, GNU, image processing, Korea, Linux, resize, rotate, scale, school